I have been using the LoadGen in the recent weeks. I have been using it as part of creating test harness for performance and stress testing in the BizTalk applications. I thought I’ll write a post about configuring LoadGen for SOAP transport.
A sample scenario: I have a WebService (which I have been using it with my SOAP adapter), which will initiate the message flow in BizTalk. I would like to create a harness which will simulate the source application to post the request message and to receive the response message back from the WebService.
Steps involved:
- Create the WebService.
- Configure the LoadGen.
- Create the source file which LoadGen use to post).
- Execute the LoadGen.
1. Create WebService
Following is the sample webservice to be used for the testing:
Build and complie the webservice project. Access the webservice from the browser. Browse to the page where you can see the SOAP message formats. Following is the SOAP Request message for the above webmethod. 2.Configure the LoadGen.
Download and install the latest version of LoadGen (2007) from the below Microsoft link (http://www.microsoft.com/downloads/details.aspx?familyid=C8AF583F-7044-48DB-B7B9-969072DF1689&displaylang=en)
Open the sample configuration file from <<installation drive>>\ LoadGen\ConfigFiles\ConsoleConfigFiles
In this case since we are going to test the webservice which inturn return the response, we will select the “SoapToSoapTwoWayLG.xml” – it’s for SOAP two-way transport. In the config file, the root element <LoadGenFramework> contains two key elements
- <CommonSection>
- <Section>
<CommonSection> element configures the default settings common to all LoadGen tasks in a LoadGen scenario. Some of the key settings are
<NumThreadsPerSection>: Number of concurrent threads that LoadGen will use to send messages.
<SleepInterval>:Interval between the subsequent threads.
<LotSizePerInterval>: Number of messages that will be sent as a lot in each thread.
<RetryInterval>: Interval time to reattempt in case of failure.
<OptimizeLimitFileSize>: If file size becomes greater than the specified limit (in bytes), LoadGen will perform streaming for optimization.
<Transport>: Transport protocol to be used for the LoadGen tasks. In this case SOAP.
<Section> element configures the setting specific to a LoadGen task.
<SrcFilePath>: Path of the source file for a LoadGen task
<DstLocation> Element contains the configuration settings for the LoadGen transport component.
<URL>: Specifies the URL of the WebService.
<SOAPHeader>: Specifies the SOAP action header for the request message to deliver.
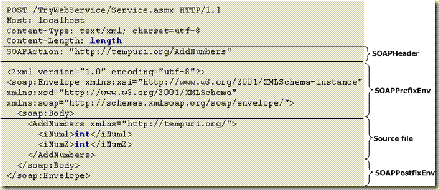
<SOAPPrefixEnv>: Specifies the start tags of the SOAP envelope and the SOAP body.
<SOAPPostfixEnv>: Specifies the end tags of the SOAP envelope and the SOAP body.
<ResponseMsgPath>: Specifies the directory location for the response message.
Coming back to configuring our sample webservice in LoadGen configuration file, perform the following steps (We are going to refer the SOAP Request message):
- Specify the input file path for the LoadGen in <SrcFilePath>
- Specify the WebService URL in <Section>\<DstLocation>\<Parameters>\<URL> element as
- Specify the SOAPHeader in the format of "SOAPAction:[value]".
- To specify the SOAPPrefixEnv, copy the start tags of SOAP envelope and the SOAP body in a text-editor from our example:
Replace the “<” with “<” and “>” with “>”, now we should have
Copy the above content and paste it in <SOAPPrefixEnv></SOAPPrefixEnv> element, like
To specify the <SOAPPostfixEnv>, perform the similar replacements with the end tags of the SOAP envelope and SOAP body. Then we should have
- Specify the directory location for the response message in <ResponseMsgPath>
Following figure could help in easily identifying the LoadGen sections from the SOAP message
<Click on the image to see the clearer view>
Create the Source file:
While configuring the <SOAPPrefixEnv> and <SOAPPostfixEnv> elements in the LoadGen configuration, we have specified the start and end tags of the SOAP envelope and SOAP body. We have not used the actual body of the message. Now we will use this to create the source file for the LoadGen. Copy the SOAP body content and paste it in a text-editor with sample value in it. (I have saved the file as InputSrcFile.txt as specified in the <SrcFilePath>)
As per your test criteria, configure the <CommonSection> element.
I have configured it to 1 file in 1 thread per section to execute the try run
For the complete LoadGen Configuration file for this sample webservice (my skydrive folder location):
Execute the LoadGen:
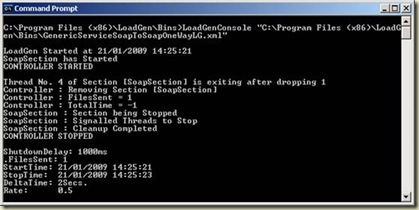
From the command prompt, navigate to the installation directory of the LoadGen and type “LoadGenConsole” with its only parameter, the name of the LoadGenConfiguration file
[installation directory]\LoadGen\Bins>LoadGenConsole TryLGSOAPToSOAPTwoway.xml
If you want to enable tracing for your LoadGen (its very essential in my experience), Uncomment the follwing lines from your LoadGenConsole.exe.config file from “[Installation directory]\LoadGen\Bins\”
After executing the LoadGen, check for the response in the directory specified in <ResponseMsgPath>


0 comments:
Post a Comment